Posts

CAGD 345-Final Project
Image
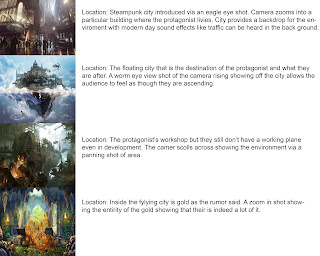
Ragalla Selib-Kaplan 345-Project Final Animatic Description: Using all our story boards, working off our concept sheets, and using our log lines we were task to create a final animatic of your story that is at minimum a minute long. The animatic would have necessary sound effects that are public domain and therefore free to use and voice acting when ever necessary. Once completed we were task with putting together all our resources in a final turn in folder and made available to the class for our animatic critiques. Story Title/Summary: Castle in the Sky ·          The story follows a young inventor who after hearing rumor of an ancient flying city that is home to boundless undiscovered treasure, plans to build a flying machine to find this city and make a name for himself but due to the expenses of building such a ship he has rand into a major road block that may cancel his plans before they even get off the ground. While wo...

3D Level 2 Feedback

Image
Ragalla Seliby-Kaplan  When designer my latest 3D level I manage to incorporate the more open-ended design but encountered some issues from my critiques. Starting out I made 3 mandatory areas that had to be explored but   I set them up in a way that allows the player to talk them in what ever order they like and even have them be settled on a platform that allowed them to over see the level before going their so that they know perfectly what they are getting into and what would be the best option to start with. I made each of them based on a specific gimmick such as platforming over acid, combatting monsters, and dodging moving blocks that could crush you. At the end you must hit a switch and go out the same way you came in but if you made it through the first time a second go around would be easy. My playtesting showed that people appreciated being able to see what lied ahead of them before going there as it allowed them to go about the level in whatever order they...

ePortfolio Progress 3

Image
Ragalla Seliby-Kaplan I UVed several of my main items in my scene but as I'm still playing catch up I have a couple more left to complete. The project overall is going well enough as I am getting my work done in a timely manner and all of my items are on my laptop where I work.  I plan on UV the rest of my work very soon despite you recommending we be done with UVing by now. I know I'm behind but I am juggling multiple projects so I make time where I can especially considering that this is one of my later works. The cart UV came out a bit weird as I used both my own and auto UV to see what it would come out like. I plan on redoing this UV as I feel the size of the UVs are disproportionate. I think this had something to do with me resizing the image to make it easier to work with and think shrinking it down. I'm not sure if that would cause an issue but I wanted to check anyway. This UV also had issues with my laptop and campus computer UVing my work di...

3D Game Level Feedback

Image
When making my 3D level I followed the tutorial presented to us in class and unfortunately used the detailed environment design rather than the simplified one which explains the time it took my assignment to upload. Despite this I still manage to implement the design I was going for using the model presented to us with the Disney example of a center place of interest and areas surrounding it being interest points to hook customers into seeing the whole park. I wanted to implement something similar but much more simplified. The idea was to have a center area that looped outward and had players to further out to explore and have to find some keys and head back to the center in order to reach the exit but ultimately I had fail in that ambition but with tools like this I can definitely see myself coming back and making something of this scale a bit more detailed for my final product. I wanted something a bit more exploratory that had you going inside some not to deep caverns to l...

Megaman Level 2

Image
When designing my Megaman level 2 I wanted to have a Metroid Vania style exploration element to the overall level. Despite the level I turned in being an incomplete version I managed to make the intended level and had friends and people online test the level and even provide me with feedback via email. The design was a strait forward linear level with now peaks or troughs at first glance and eventually you reach a door at the end of the level where you need 4 keys. To find the keys you must engage in activities you might night even think was a wise choice on your first run through. Jump to heights on platforms mysteriously higher than normal and arranged in a stair like manner gets you into the upper portion while falling through a pit gets you to the lower half. I also avoid death pits in general as to not lie to the player about some pits being okay and other not because I feel like that’s pretty cheap the design allows for players to explore and get the keys needed to succeed wi...

Megaman Level 1 Version 2 Feedback

Image
Ragalla Seliby-Kaplan When developing the second level using the first as a base was a simple task as I was able to implement various aspects of design I wanted in my previous level. Unlike the last level however I felt like I ran into the problem of inconsistency as when making this one I mainly went by the seat of my pants when designing it. Ultimately, I had a clear vision of the max size of my level and how I wanted it to end but getting there was basically me filling up the spaces until I got there.  The linear levels I want to avoid as I feel they are too simple.  When making the level I had much more creativity flowing from me than last time as I was used to the system even after the updates. Creating levels was like drawing and I just let whatever came to me out and honestly if worked out in my opinion for the best. I kept the overall linearity of the level deciding that if I was going to expand the overall design into having more roots then I was goi...

Megaman Level 1 Feedback

Image
Ragalla Seliby-Kaplan When creating my Megaman level I looked up other levels from Megaman 6 and Megaman 1 specifically. I looked up the overall size of each level and wanted to make something of equal length if not a bit shorter. While I have not played a classic Megaman game in a while, but I have played the x series which is overall the same. When working with the Megaman level design I counted the number of squares necessary to make the level the right size and proper length. When developing I will admit it took me a but to get the hang of the program but after that making levels was a bit easy and fun. I made the levels linear as it was supposed to be as and kept up with the usual Megaman level design methods. While not using spikes, I wanted to avoid pits at all cost but compromised and used them but avoided things that I personally felt were a bit cheap such as enemies on small ledges. Due to the lack of enemy variety I decided to have them placed in unique areas to add varie...

320Knife Seliby-Kaplan_Ragalla

Image
The knife assignment was my first introduction to retopology in Maya as with the rest of the class, but it was simple enough to grasp at first. The real issue came in curving the knife using only squares as I caught myself overlapping a few of my polygons which caused me to reshape and delete a few to get them all in order. Honestly retopology took up most of my time when working with this as it was a slow and steady process.  UVing was easy enough to follow as I used online tutorials to help with preparing it for substance painter which was the shorter of the assignment compared to everything else. I had some issues that required me to look up how to guides on retopology with certain curved objects, but I managed to get the assignment done on time at least. The materials used for the dagger were improvised on my part as I could find or make one to one material for it.  I did however come away with the knife looking too polygonal and less like the act...

DND Map 2 Version 2 Tiered Feedback

Image
Ragalla Seliby-Kaplan Regarding the group mapping I say we had a clear idea of what we were going to make. The idea of a level by level prison escape speaks for itself as the ideas just flowed naturally. We all took our existing levels and see how we could remake them into something on a scale of low to high difficulty. We planned on making a shared document where we could create our levels separately and then have the other critique the general layout as each one of us was aiming for a beginner, intermediate, and final level design map course. That way we can work on our own time, show off our levels, remake them if they conflict, come up with new ideas to share for board design, and coordinate accordingly. In this sense we manage to stay on top of our design all together and avoid repetitive map layout and avoid conflicting ideas so our make could make and contain a linear and consistent story. What went wrong however was the timing of it all. We only had about two days t...

Eportfolia Game Scene Post 4

Image
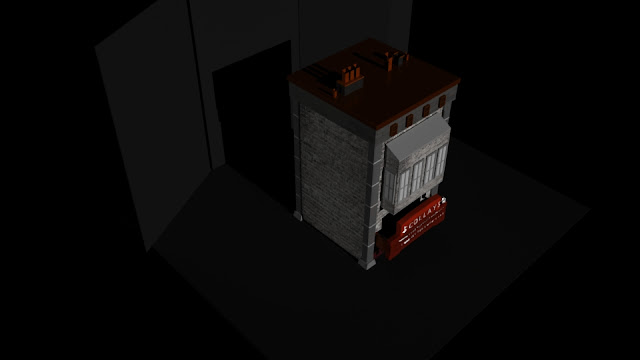
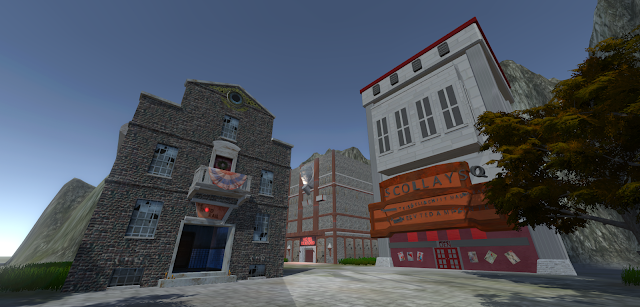
Ragalla Seliby--Kaplan I was UVing the rest of the building, such as the sign, and front doors which required a different texture than the base building due to how different and honestly contrasting it was. The red hue from the light was difficult to get but I used a texture of grey light marble and provided it with a red hue to make it appear red from the lights from under the sign. The text for the sign was also a bit of a hassle, as I used to Text available in Maya to make it but as you can see from the concept and official art some letters are missing and others are positioned awkwardly. I had to separate and arrange them all separately to make them fit but what really was an issue was the inconsistency between artworks. The concept art features different text than the official art and both of them are rather hard to make out. I decided to follow the concept art more as it allowed for a front view making it easier to model. The posters and shingles in the front we...

Eportfolio Post Game Scene 3

Image
Ragalla Seliby-Kaplan When working on UVing, using the templates I found the main issues were getting realistic brick types that didn’t seem too out of place. I tried to match the images I found on the internet as close as possible and I felt like it did for the most part. The overall image is quite inconsistent on the official art with bright whites clashing with rusty reds and that required me to make some rust textures to use for my texturing. What I found was orange tinted rust textures, but I altered them a little in photo shop to make them more vibrant and hide some of the more contrasting colors that can come from rust. Using the concept art to fill in the spaces helped with UVing the roof as I had to find textures that could replace the ones on the art because they were drawn by hand not made using computer software.  The vents also had to get the same rust texture as being drawn and being at a distance prevented me from seeing what m...

Eportfolio Post Game Scene 2

Image
Ragalla Seliby-Kaplan My plan for my game scene was to utilize basic brick mapping from templates I could find online. The bricks I found were specifically grey and those that were not were altered in photoshop. I plan on proving a lot of guess work for the areas of the building I cannot see as I do not own Fallout and cannot find a full image online which kind of is bothersome. The next issue I feel that I must tackle is the broken windows and damage landscape. I’m doing only the building but pieces of it are rather inconsistent regarding certain images online. The building appears to be ragged in some images but clean in others. Again, I do not play Fallout, so I don’t know if this was in the story or not. I plan on meshing certain images together, however. Using the concept art and the official art as a reference to make a blend of official and concept for this project to better fill in missing spaces. I also beveled many of the polygons for my block out ...

ePortfolio 230 Game Scene Final

Image
Ragalla Seliby-Kaplan Final Assignment The project as a whole was a rather difficult one for me due to having to balance it out with multiple projects and groups. For the most part I worked on this on my laptop to avoid incidents that plague my last few projects. My building the Memory Den utilized several brick, rust, and marble textures to make out the main base of the buildings. The inspiration from Fallout 4 was a challenge as I never played it and could not get a good look of the building using online images. I improvised with the unseen aspects and also used a combination of concept art and completed art of the building. I used Maya 2018 for my project as and I followed the portfolio patterned of project development starting with blocking, restarting with the block as a reference, bevels, UV, coloring, and lighting. The most difficult part for me was the sign and I felt it came out the worst in Unity with the words bugging out on me which was upsett...

Living Room Slide

ePortfolio 230 Game Scene Part 1

Image
Name: Ragalla Seliby-Kaplan Game: Fallout 4 Area: The Memory Den Render 1 My group is doing the Good Neighborhood from Fallout 4 as Fallout76 has not been released yet. We decided to break up the scene into 3 parts and my part is the Memory Den and the neighboring buildings next to it. The entire Good Neighborhood was something we couldn’t get so we decided to capture an angle with the most environment and make that. With my scene I started with the 3 buildings, the main Memory Den and the buildings to the right and left.  Memory Den Reference  The story we are trying to capture is a functioning but run down city in the aftermath of a nuclear fallout. I want to make the place look well enough to live in but clearly rundown enough that if this were in the real world no one would live in it. The context of this Den is important as in the world of Fallout this place might seem actually nice but dangerous to our sensibilities. Render 2   I sta...

ePortfolio Post 4 Living Room

Image
Ragalla Seliby-Kaplan Assignment: Living Room Progress 4 Final Final Image When concluding this project with remaking the chairs I feel it came out much better. When working on this project I lost a lot of time due to illness and having to go back home for practically a week spending it bed written but I feel I manage to make up for it with a more simple approach to my room. The ceiling and the ceiling lights were a big change. The idea of a ceiling fan was a bit difficult to model with each side needing to be perfectly angled so I changed it to cone ceiling lights that can illuminate a room but avoiding the who angle fans. I gave the room a feeling of emptiness and from light coming from outside to capture the feeling of a house at night with the lights off with the moonlight illuminating the place. Reference Image One thing I wanted to do but could not was curtains as I feel that I currently lack the skill to pull something like that off. The posters were simpl...

ePortfolio Post 3 Living Room

Image
Ragalla Seliby-Kaplan Assignment: Living Room Progress 3 When working on the assignment for this week I focused on lighting and where I would position it. I thought of putting the light source outside as to give it a light from the darkness shining through the window but that didn’t work out as best as I wanted it to as not all of the room was light up. Wall Textures, slightly edited to look a bit less new but not old. I removed several objects from the scene as I am planning on remaking the chairs, due to issues with beveling not working for some reason. This occurred with several more of the objects with problems that needed to be re made and beveled over again but I feel it necessary as not doing it again would cause issues. Floor textures edited to look cleaner. Regarding textures I didn’t come up with any issues due to only needing one face, having to UV the sides that won’t be shown in the scene won’t be a problem thus making UV more simple. I will how...

ePortfolio Post 2 Living Room Progress

Image
Name: Ragalla Seliby-Kaplan Assignment: Living Room Reference Image I plan on making some alteration and unique interpretations to this design like incooperating a third wall, including a TV or adding a ceiling light. I plan on having 2 main light sources. The outside sun from the perspective of the window and my added ceiling light. The current light I have is outside the image for the sake of posting my progress. My render scene I added wall and floor textures which was pretty simple as I only needed one face versus several faces such as with a 3D object. Because the floor is flat I can treat it as a 2D object. The three large rectangles on the wall will be where I place the windows and outside it a 3rd light to capture more accurate shadows. The squares on the other side of the wall will be pictures with the inner square being where I will UV in the image. I plan on curving out the couches as they are still blocks but I placed them and sized them according to what they ...

ePortfolio Post Living Room Progress 1

Image
Ragalla Seliby-Kaplan Assignment Living Room This image is my reference for what I plan on doing but with some differences here and their as changes to potential lighting and object placement to make it look like one complete image. The overall project will not be a one for one recreation and I will be taking liberties with this project. I want to create a basic living room, something you could realistically seen in a middle/ upper middle class house. This is the overall skeleton of my assignment but it is subject to change in the near future. I plan on doing something simple such as a couch, windows, and maybe a TV set. I was planning on being creative when constructing the ceiling and potentially adding other objects to the scene.

Grocery Shelf

Image
Ragalla Seliby-Kaplan Assignment: Grocery Shelf The Grocery Shelf assignment was the first big assignment I had in this class and required several days of work and preparation to get done. The base shelf was simple enough just using squares and rectangles overlapping to make a basic two leveled shelf. The texture was some simple online texture with smooth wooded texture to get how it look. I rather choose a smooth metallic surface of black to get it to contrast with the items. The boxes I sued were all based on the box from the cereal assignment but resizing the various boxes to fit the requirement for each one. Using the online box art sight, I used various box arts to make each individual item. I did clone each of the boxes to fill out the shelf because using only 6 items would seem a bit weird but still filled the requirement. The sides that were not complete but only containing maybe the front and back allowed me to fill in the spaces that were not put on the sight....